Saturday, December 31, 2011

Yacht Power Inverters - A Guide

!: Yacht Power Inverters - A Guide

Power inverters

Computers, hi-fi and microwave ovens use considerable power, so if you're considering using them on board you'll probably need power inverters.

An inverter is probably one of the first extras most owners consider buying for their boat, whatever size it is. The ability to use 240V equipment when you are on passage or moored away from a shore supply is prized by most people. At the same time, an inverter is one of the easiest items to install, providing you understand the basic steps involved. Inverters range in size from 50W to 4kW, and can power most items that you now plug into the mains, but you need to understand their limitations, and for that you need to understand what makes them tick.

How they work An inverter takes low-voltage direct current (DC) from batteries, usually 12V or 24V, and converts it to high-voltage alternating current (AC), either 110V, 230V or 240V. The process is the same as your battery charger, except in reverse, and some combi models double as chargers, using the same basic electronics inside. Early inverters used transformers to step the volts up, and were heavy, but most modern models use solid-state electronics, both to step up the voltage and to convert the current from DC to AC, and are correspondingly lighter.

Domestic mains supply voltage follows a sine-wave form with a rounded top as the current alternates. But, while this wave form is easily produced by a rotating generator in a power station, it's more complex and costly to produce electronically and wastes more power. Instead many inverters use a modified sine-wave, or quasi sine-wave, which has a flat topped or square curve. The modified sine-wave powers most AC equipment, but can struggle with some items, particularly electronics with internal power supplies and digital timers like computers, TVs and microwave ovens. Recently the internal power supplies for most electronic equipment have changed to switch-mode systems, which better handle poorer quality incoming AC. At the same time, the standard of the best modified sine-waves has improved markedly, close to that of a pure sine-wave.

Yacht batteries and marine batteries

An inverter can provide high outputs but all this power has to come from your batteries. Short burst high power appliances like a microwave oven, kettle, toaster or hair-dryer are fine, but to run heaters or machines for long, you need a very large battery bank or engine power.

As we have said, virtually anything that you now plug into the mains can be run from an inverter, but the size of your unit governs what it will power. Up to 500W you can run computers, TV, hi-fi, battery chargers for your mobile phone and cameras, and even a 240V domestic fridge, though not always all at the same time.

Up to 1,000W, and you can add a small travel hair-dryer. For most people however the big plus is being able to run a microwave oven and for this you will need at least 1,500W, preferably 1,800W. Don't be confused by the 60OW or 80OW rating on most microwaves. This is the useful cooking power they generate, not the amount of power going in, which will be double this figure.

And at this size, your inverter should also power a standard hair-dryer, plus possibly a kettle, toaster and coffee-maker, though these may require 2kW.

Installing an inverter is within the capabilities of a competent DIY electrician, but if you've any doubts, leave it to a professional. A 2kW, 12V inverter will be drawing up to 200A from your batteries, more than many engine starter motors, so you need large diameter cables, short runs, and good connections. For the higher output models, use 50mm cables (35mm for lower outputs), a maximum of 1.5m long with properly crimped lugs, not screw connectors as they work loose. Anything less and you could lose too much power down the line, which means reduced performance and possibly tripping the inverter. You need proper cable from a battery dealer or automotive electrical supplier. Measure the exact length you want before you buy. They will probably crimp the terminals on for you, but check the diameter of the studs. Most batteries will be 8mm, but the inverter may be l0mm.

If you have to mount the inverter further away, use 70mm cable, or two 35mm cables in parallel for both positive and negative.

Unless a main input fuse is already fitted, you'll have to fit a 250A fuse in the supply line. It's also a good idea to have a separate battery master switch in line, so you can disconnect the unit completely. This must be capable of taking 250A continuous load. Check the size of its terminal studs - they will usually be l0mm.

The DC input terminals on some units were very close together, risking short circuit. If there are no plastic terminal covers, fit your own.

Your battery bank is a major consideration when fitting any but the smallest inverter ...If you take 200A out of a fully-charged 200Ah bank, the voltage at the battery terminals will drop from 12.6V to 11.0V at the inverter. If the bank is only half-charged, the voltage could be down to 10.5V, close to the low voltage tripping point of 10.0-10.5V.

If you're fitting a 21kW inverter, you should have a minimum of 400Ah batteries, preferably 600Ah. For a 1 kw unit, you will need 200Ah, preferably 300Ah.

All these figures assume the engine is not running, which is the usual situation when moored. If you start it up, you will get an input from the alternator, and the battery volts will rise, which will improve the situation, but you should not rely on this.

The condition of your batteries is also important. High continuous current drains will hammer the bank, and quickly find out any weak cells. Gel or AGM batteries will be better able to handle continuous heavy loads.

The 230V output from the inverter will be either one or more sockets on the front, or you may have to hard-wire a cable internally Again, only do this if you are sure of your proficiency. UK three-pin outlets are best fitted sideways or upside down so that large plugs or power-supplies dont foul the base.

Because the inverters have to be close to the batteries, they will usually be mounted in the engine space, or at least away from the galley area. But because most of them have a continuous residual current drain in standby-mode, you don't want to leave them permanently switched on. A remote control panel allows you to turn off the inverter when it's not needed.

Ideally you should fit a change-over switch in the output circuit to switch the incoming AC power between shore supply, generator, and inverter. It's important that you don't have two different power sources feeding into your ring main at the same time. Make sure you get the polarity right when connecting the DC or you could damage the unit

Any piece of electronic equipment will give a high short-term output, but will quickly cut out as it heats up. Best practice is to use the continuous rating to describe the unit. Having said that, the intermittent rating is important, as some pieces of AC equipment, particularly those with motors in them, have a start-up surge that needs a short burst of higher power.

Most power inverters drain a continuous current when switched on, even when you're not using them. This standby current will be at least 2A, sometimes more, which, over 24 hours, it could drain 50Ah or more from the batteries.

This is why a remote control is important. Some models have a powersave mode. This sends the unit to sleep while nothing is connected and wakes it up when it's needed. The drawback to this is that tiny currents, like the timer light on a microwave, will not trigger the unit, so the microwave won't start. Your mobile phone charger will also probably not activate the inverter, so you still need to turn it on manually.


Yacht Power Inverters - A Guide

Neversink Spa Grand Sale

Sunday, December 25, 2011

LiteFuze 50-1600 Watt Travel Voltage Converter Transformer Kit Worldwide Socket Plug Adapters

Envelope Seals Monogram Save You Money Prices Plantronics Cs361n Line Trimmers Best Quality

Sunday, December 18, 2011

Power Bright VC2000W Voltage Transformer 2000 Watt Step Up/Down 110 Volt - 220 Volt

!: Last Minute Power Bright VC2000W Voltage Transformer 2000 Watt Step Up/Down 110 Volt - 220 Volt Order Now

Brand : Power Bright
Rate :
Price : $88.39
Post Date : Dec 18, 2011 21:18:16
Usually ships in 24 hours


This is a voltage converter or transformer that can be used as a step up transformer in 110/120 volt countries or as a step down transformer in 220/230/240 volt countries. This heavy duty voltage transformer can be used for continuous duty. It will convert voltages of 220-240 volts to 110-120 and will also convert voltages from 110-120 to 220-240 volts.

Audio Cassette Player Guide

Tuesday, December 6, 2011

LiteFuze LT-5000 5000 Watt Heavy Duty Voltage Converter Transformer - Step Up/Down 110/120/220/240V - Fully Grounded Cord (Free Euro Plug) - Patented Universal Output Socket - Circuit Breaker Protection

!: Discount LiteFuze LT-5000 5000 Watt Heavy Duty Voltage Converter Transformer - Step Up/Down 110/120/220/240V - Fully Grounded Cord (Free Euro Plug) - Patented Universal Output Socket - Circuit Breaker Protection buy online

Brand : LiteFuze
Rate :
Price : $199.00
Post Date : Dec 06, 2011 23:13:55
Usually ships in 24 hours


5000 Watt Maximum Capacity Heavy-Duty Voltage Converter/Transformer Heavy duty for continuous use On/Off Power Switch LED Indicator for Power Source Single phase Dual Voltage Step Up or Step Down functionality Input: 110V/120V or 220V/230V/240V (Single Phase) Output 110V/120V or 220V/230V/240V (Single Phase) Input Selection in the rear of the converter Weight: 55 lbs. Dimensions: 7.25" x 9.75" x 6" Four outlets for output in the front - 2 sockets - Universal outlet (220v) - 2 sockets - German Shucko outlet (220v) - 2 sockets - USA Grounded (110v) Fuse protected - Fuse will cut off the current if the transformer is overloaded to protect the transformer and your appliance NOTE: We recommend to use a Voltage Converter / Transformer that's max watts is at least 50% higher than your appliance. Some appliances such as Power tools, Motors, Laser printers and TVs require 2-3 times more watts at start up than the printed rating.

Skechers Outlets Review 12v Electric Water Pump For Sale Purchasing Lcd Projector

Friday, November 25, 2011

Buyers Guide For Voltage Transformers

!: Buyers Guide For Voltage Transformers

Voltage Transformers are used for metering and protection in high-voltage circuits. They are designed to prevent negligible load to the supply being measured and have an exact voltage ratio to accurately step down high voltages so that metering and protective relay equipment can be operated at a lower potential. Voltage Transformers are used with grounded (3-pin) appliances and can be used with both "electric" and "electronic" appliances. They can be used continuously for long periods of time and at higher wattages.

There are low voltage transformers (Step Down) and high voltage (Step Up) transformers. While the former are used to step down voltage and convert it from 220V to 110V, the latter function by stepping up voltage and converting it from 110V to 220V. Some transformers are dual voltage also.

If you are thinking of buying a voltage transformer, the following tips will help you select the right transformer for your appliance:

1. Determine if your appliance actually requires a transformer. Look for the voltage rating on the appliance; if the rating states something similar to 100Vto 240V that means your product is dual voltage. In such a case you can use your product in a 220V without a transformer. If the voltage rating is 110V or 120V, it means that your product is only single volt and will require a step down transformer for use in 220V.

2. Once you know that you require a voltage transformer, you need to determine the right kind for your product. Look for the watt rating on the appliance or calculate wattage by multiplying voltage x amps. Select the transformer according to the wattage rating of your appliance. It is better to use a transformer that is rated at least 25% higher than your product's wattage rating.

3. After selecting the right transformer, make sure that you have the proper plug adapter on the transformer.

4. Always buy voltage transformers and adapters from a reputed source only.

Samstores is your online source for all kinds of voltage transformers, GSM phones, video converters, portable DVD players, power inverters, etc. The company is one of the largest distributors of household electronic goods and is well known for providing great brands at unbelievable prices. Here, you can get 110V and 220V household appliances for use in North America and 220V for Europe and Asia and dual voltage goods for usage all over the world. Their hacker-free website guarantees easy navigation and a secure online purchase and check out procedure.


Buyers Guide For Voltage Transformers

Bird Feeder Peanut Butter Guide Information Poulan Snowblower Parts Help Bagless Vacuum Cleaner Reviews 2009

Saturday, November 19, 2011

European Power Converter - Finding the Best

!: European Power Converter - Finding the Best

When you're ready to travel across the country, you're going to find that your electronics may not be able to plug into the outlets, since a place like Europe is going to use a different type of power. Instead of purchasing a laptop, TV, or whatever it may be to work there, there are some converters that are going to work for you.

How can I find the right one?

The first thing that you're going to ask yourself is where you're heading. If you're going to Europe from the United States, you will want to find one that converts from the USA to Europe. If you're going from Europe to the USA, you will want to get one that's the other way around. Some will work with both, but it's important that you read the description to see which one is going to work for you.

Listed below are a few that you should check out when you're ready to make your purchase.

All-In-One Travel Power Plug - It's less than and is going to work with it's built in plug. Its convenient and it's fairly easy to use. You can plug this adapter in and it's going to work in over 150 countries! Simran 200 Watts - This one is going to set you back about . It converts 220/240V foreign power to 110V. It's great for laptops, ipods, battery chargers, and more. Universal World Wide by Eforcity - The last one on my list is very compact and is going to work in countries such as Europe, the Middle East, Africa, and more. It also comes with a built in surge protector.


European Power Converter - Finding the Best

Trimmer Edger Decide Now Vision Fitness R2200 Recumbent Bike Buy Online

Monday, November 14, 2011

Goldsource® STU-3000 Step Up/Down Voltage Transformer Converter - AC 110/220 V - 3000 Watt

!: Cheaper Goldsource® STU-3000 Step Up/Down Voltage Transformer Converter - AC 110/220 V - 3000 Watt grand sale

Brand : Goldsource
Rate :
Price : $107.95
Post Date : Nov 15, 2011 06:57:23
Usually ships in 24 hours


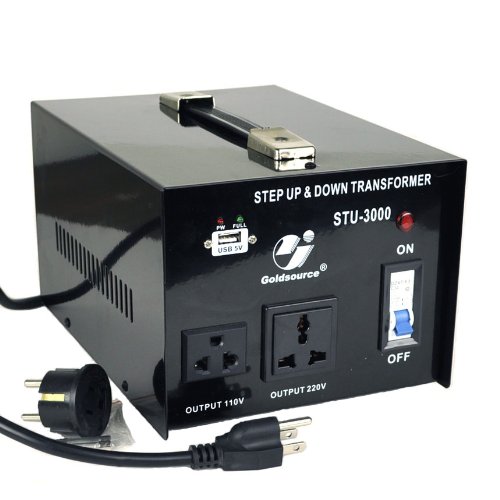
Made by one of the leading manufacturers in the industry, the Goldsource ST series step up/down voltage transformers offer you a safe, reliable, affordable & convenient solution to converting voltages from 110-120 volts up to 220-240 volts or from 220-240 volts down to 110-120 volts for both home use & industrial applications. The ST-3000 is rated at 3000 watts maximum. It features a heavy-duty cord with a standard US 3-prong plug plus a free American to German outlet plug adapter. There are a total of two grounded outputs on the front panel, one is designated for 120 volts and the other is for 220 volts only. They both are standard US outlets and can be used simultaneously. For safety, it's recommended by the manufacturer that the voltage transformer's maximum power should be equal or greater than the power rating of your appliance multiplied by 1.5. For example, if you have an appliance rated at 100 watts, you will need to pick a transformer with a maximum power of 150 watts or greater.

Massager Grand Sale Gooseneck Lamps Quiz

Saturday, November 12, 2011

How to Use a Flip Over Saw

!: How to Use a Flip Over Saw

Preparation and setting up

When setting up a flip over saw it is important that you choose a suitable site to work from that is flat, level and free from loose materials, debris or rubble. Check that the flip over saw is firm and does not move.

Your power supply should be from a safe point with enough capacity for the start up surge of a powerful motor, often around 2000w. This supply should have some kind of circuit protection preferably a sensitive breaker that will trip in the even of an accident. If using a 110v transformer, site this next to the power point and use a suitable 110v extension lead to the flip over saw. DO NOT run a 240v extension lead to the 110v transformer at the saw!

Sensibly route the power cable to the flip over saw away from the work area and not suspended off the ground in any way to cause a trip hazard.

Gather together your personal protection equipment (PPE), which should at least comprise of suitable safety glasses and a good push stick if using the flip over saw in table cutting mode. Ear defenders are a good idea if in an enclosed space or if using the saw for extended periods and absolutely essential if cutting aluminium (special blade required) (as the noise from these blades can be horrendous!) If not using a dust extraction system then dust nuisance face masks should also be considered especially if ripping down long lengths of material or working in an enclosed space.

As always wear stout, steel toe capped boots, sensible clothes and tuck away anything loose that could be pulled into the blade. Wearing rings and other jewellery is not to be recommended either. Hard hats are needed if there is a danger from above or if passing long lengths of timber overhead.

Your material stock should be sited to hand and safely stacked, removing a single length should not cause the stack to collapse!

This writer likes to site the saw so that I don't have to walk around it to take the freshly cut workpiece back to the work place and then stack the materials to the left hand side for convenience. This leaves a clear route between the flip over saw and the workplace. Being efficient means getting more work done for less effort!

If cutting lengths longer than say 1 meter, some kind of side supports are going to be necessary. Either commercial saw supports or custom altered 'saw horses'. This writer uses metal folding type, saw horses with a timber packing piece screwed to the tops; making them the exact same height as the mitre saw 'bed'. Three is ideal, two to the left and one to the right to catch the off cut. Two to the left is needed as the material may get smaller and smaller if cutting several sections out of one length. This is essential for safe working and to prevent the blade snatching the workpiece as it cuts through.

Plan your work so that you minimise the amount of times that you need to 'flip' the saw over into table mode and back, if you can. For example; do all of the table saw cuts first and then switch to your mitre saw cuts. This is not always feasible or practical though and fortunately most flip over saws are quick to change over.

Working with a flip over saw

If you have set up as described above you are readily and will work efficiently and more importantly safely!

Mitre saw cuts

Material should be placed gently on the flip over saw and slid to the area to be marked and cut. Dropping heavy material on to the saw bed will eventually ruin the flip over saws accuracy settings and may even damage the saw.

Long lengths should be marked from the left and short lengths of say under a meter should be marked from the right. This is to ensure that the longer side of the material to be cut is to the left as this is the side which you will be firmly holding as the saw does its work.

Place the material under the blade and grasp the handle with blade guard release DO NOT PRESS THE POWER SWITCH AT THIS POINT.

Gently pull down the saw until the blade almost touches the material and adjust the material side to side, until the blade is positioned to the waste/off cut side of your mark.

Release the saw back to its resting point and keeping a firm grip on the workpiece, start the motor.

While waiting for the blade to reach full speed, listen to it. Become familiar with how the motor sounds and be vigilant to anything unusual. Sometimes small pieces of material get trapped in the guard mechanism and can rub against the blade until they fly out without warning! Stop, unplug the power and investigate any unusual sounds immediately!

With the blade at full speed and sounding good, gently pull the saw down into and through the workpiece. Become familiar with how the blade feels and cuts, learn to judge how much pressure to apply and do not slow the blade down excessively, about 10% or so is about right. Once all the way through the material, gently return the saw to its upright position, switch off the motor and wait for the blade to completely stop.

All done, you should now have the correct size workpiece. Ready for transferring to the workplace for fixing.

Never leave a flip over saw running in-between cuts. On a busy site a running motor can be dangerously and deceptively quiet.

Table saw cuts

Fold down the saw 'head' and secure as directed in the manufacturers instructions (they vary a little), 'flip' the saw over and listen for the locator catch to click. Always 'double check' visually that the saw bed is secured in position.

Always use the riving knife and blade guard when ripping down timber, again, as per manufacturers description. This stops the timber binding the blade after the cut and prevents the blade 'throwing' the timber back towards you at some speed!

Set up the fence or guide if making a parallel cut using the graduated marks on the saw table bed or by measuring between the fence and blade with a tape measure.

If you have set up the saw as per the earlier instructions you should have a clear area in front of the flip over saw (it is so tempting to stack material behind you, but as you can see, this is a mistake).

Once you are ready, start the flip over saw and step back from the machine with your material in hand. Again, listen to the motor as the blade spins up to full speed and place your material on the front edge of the table and line it up with the fence.

By now the blade will be running at full speed, gently but firmly feed the material into the blade, keeping a firm sideways and downwards pressure on the material into the guiding fence and table bed. Once you are about half way you have the option to stop, withdraw the material, turn it over end to end and run the other half through until you meet the first cut. Shorter lengths may be fed straight through in one go, keeping hands well away from the blade or use one or two push sticks.

Personally, this writer does not like to get any closer to a running blade than about 100mm or 4"; sure I know many that run much closer than this, but hey, I like all of my fingers!

Off cut management

Always know where your off cut is going to go. Small ones can fly out if not properly managed and long off cuts can tip and trap the blade also causing trouble. Good support is the answer, BEFORE, DURING and AFTER the cut.

Limitations

Assuming that you have the right size saw for the job in hand and it can physically cut the material. The only limitation that you will find with a flip over saw is that of having to continually flip the machine between the two modes if the work demands it or you don't properly plan your cuts. Flip over saws do mean that you need to look a little further ahead and think about what you are doing.

As with many combination machines there is some compromise to achieve the flexibility. With flip over saws this may mean that the table saw bed is a little small or that the capacity of the mitre saw is a little less because it doesn't have a sliding arm.

Ultimately though, using a flip over saw is simple coupled with good capabilities and versatility means that a flip over saw can handle most jobs, either on site or in the workshop at home.

Additional reading

Amazon stock several hundred books on this subject; search for power saws, table saws or mitre saws for best results.

Reviews can be found on most tool supply sites these days.

Conclusions

Choose a suitable and safe site to set up the flip over saw, ideally away from other workers.

Ensure that the flip over saw is on a firm base and does not move.

Use a safe protected, power supply and sensible cable routing.*

Ensure your 'push stick' and personal protection equipment (PPE) are to hand.

Arrange materials close to hand and safely stacked to your left (when facing the saw).

Ensure your route from the flip over saw to the workplace is logical, clear and safe.

Plan your work, dividing jobs into mitre saw and table saw modes.

Use side supports if material is over a meter long.

Mark material from the left unless the cut is under a meter, then mark from the right.

Firmly hold workpiece and don't allow the blade to touch the material until up to full speed.

Never leave the saw running in between cuts.

Always use the riving knife and blade guard when ripping down material.

Keep your hand/fingers at least 100mm plus away from a running blade.

Clean off sawdust and pack away carefully for next time.

Carefully wipe the blade with a light oil if not using the saw again for several weeks.

Keep the saw storage area locked and the saw under an old sheet or blanket.

Warnings

Your protected power supply should be from a safe point with enough capacity for the start up surge of a powerful motor, often around 2000w.

If using a 110v transformer, site this next to the power point and use a suitable 110v extension lead to the flip over saw. DO NOT run a 240v extension lead to the 110v transformer at the saw!

Sensibly route the power cable to the flip over saw away from the work area and not suspended off the ground in any way to cause a trip hazard.

Gather together your personal protection equipment (PPE), which should at least comprise of suitable safety glasses and a good push stick if using the flip over saw in table cutting mode.

Ear defenders are a good idea if in an enclosed space or if using the saw for extended periods and absolutely essential if cutting aluminium (special blade required; as the noise from these blades can be horrendous!)

Consider Dust nuisance face masks if not using an extraction system.

As always wear stout, steel toe capped boots, sensible clothes and tuck away anything loose that could be pulled into the blade.

Wearing rings and other jewellery is not to be recommended either.

Hard hats are also needed if there is a danger from above or if passing long lengths of timber overhead.


How to Use a Flip Over Saw

Binocular Repair Parts Review

Wednesday, November 9, 2011

Power Tools For the Professional or the Do it Yourself Enthusiast

!: Power Tools For the Professional or the Do it Yourself Enthusiast

Whatever your background or requirement power tools are used in almost every environment to improve productivity and usually improve the quality of the work undertaken. When we refer to power tools we usually refer to corded power tools or cordless power tools. There are however a comprehensive range of pneumatic power tools which are great if you have compressed air available. Pneumatic tools lack the obvious portability of electrically powered tools and are frequently confined to the workshop environment where the work comes to the tools rather than the tools going to the work

The electric drill was regarded by most as the first powered hand tool. The first electric drill was patented in Australia on 20th August 1889 an attributed to Arthur James Arnot. This first drill was primarily intended for heavy industrial use and was invented before most communities were even supplied with electricity. In 1917, Black and Decker introduced and patented the pistol grip and also the trigger switch familiar on most products available today. This was the basis of the modern electric drill and later models were soon shipped in thousands. 1961 saw the first battery powered drill and as technology improves and prices fall we are now in a position where the battery powered drills have taken over from the corded big brother.

The brief history just serves to illustrate the development of the drill and close on the heels of the drill were many other corded and cordless power tools. Mains powered devices operate on a variety of voltages 120v in the US and in Europe we operate on two voltages. We have 220-240v powered tools normally used in the home and for the less demanding applications whereas in the construction arena health and safety demands 110v units powered by 220-240v to 110v transformers. Battery powered tools use different battery types and operate at different voltages. The power screwdriver is the least demanding of the electrically operated tools in the power toolbox and may be supplied with as little as 3.6v batteries. The capability of the batteries has increased year by year as we have seen battery technology move gently from 9.6v to 36v such that we now have tools supplied with batteries rated at 12v, 14.4v, 18v, 24v and 36v. Needless to say the 36v tools are much more expensive than the 12v tools. The development in battery technology has been considerably more than just building larger battery packs. The latest batteries are Lithium-ion or Li-Ion batteries which enable more battery power to be delivered and batteries can be quickly recharged.

With the advent of these higher voltage batteries we now have a wider range of battery powered cordless tools. The cordless circular saw was not viable before the 18v or possibly the 24v batteries became available. The SDS drill and demolition drill had always been corded until the latest range of batteries mean there are now SDS and demolition cordless drills on the market operated on 36v power packs.

Woodworking powertools have always been popular both in the construction industry and for DIY enthusiast. Increasingly the cordless power tools are being used in all areas of industry where just a few years ago the batteries would just not be man enough, or need recharging too frequently or just too expensive. We now have cordless jigsaws, Kango Drills and Breakers, Metal Cutting Saws, Percussion Drills, Reciprocating Saws, Sanders, SDS Drills, Wall Chasers, Band saws, routers, planers and other specialist powered tools.


Power Tools For the Professional or the Do it Yourself Enthusiast

!: Compost Bucket Plastic Beaded Curtains Tips Liver

Wednesday, November 2, 2011

LiteFuze LT-2000 2000 Watt Heavy Duty Voltage Converter Transformer - Step Up/Down 110/120/220/240V - Fully Grounded Cord (Free Euro Plug) - Patented Universal Output Socket - Circuit Breaker Protection

!: Prices LiteFuze LT-2000 2000 Watt Heavy Duty Voltage Converter Transformer - Step Up/Down 110/120/220/240V - Fully Grounded Cord (Free Euro Plug) - Patented Universal Output Socket - Circuit Breaker Protection buy online

Brand : LiteFuze
Rate :
Price :
Post Date : Nov 02, 2011 18:06:05
Usually ships in 24 hours


2000 Watt Maximum Capacity Heavy-Duty Voltage Converter/Transformer Heavy duty for continuous use On/Off Power Switch LED Indicator for Power Source Single phase Dual Voltage Step Up or Step Down functionality Input: 110V/120V or 220V/230V/240V (Single Phase) Output 110V/120V or 220V/230V/240V (Single Phase) Input Selection in the rear of the converter Dimensions: 7.25" x 9.75" x 6" * Weight: 29 lbs. Four outlets for output in the front - 1 socket - Universal outlet (220v) - 1 socket - German Shucko outlet (220v) - 2 sockets - USA Grounded (110v) Fuse protected - Fuse will cut off the current if the transformer is overloaded to protect the transformer and your appliance NOTE: We recommend to use a Voltage Converter / Transformer that's max watts is at least 50% higher than your appliance. Some appliances such as Power tools, Motors, Laser printers and TVs require 2-3 times more watts at start up than the printed rating.

!: Guitar Tuners Acoustic Orthopedic Running Shoes Buy Online Ati Radeon 3450 Driver Tutorial

Monday, October 31, 2011

Goldsource® Step Up and Down Voltage Converter Transformer THG2000 - AC 110/220 V - 2000 Watt(Free Shipping)

!: Low Cost Goldsource® Step Up and Down Voltage Converter Transformer THG2000 - AC 110/220 V - 2000 Watt(Free Shipping) fast


Rate : | Price : | Post Date : Oct 31, 2011 17:45:15
Usually ships in 24 hours

Made by one of the leading manufacturers in the industry, the Goldsource THG series step up/down voltage transformers offer you a safe, reliable, affordable & convenient solution to converting voltages from 110-120 volts up to 220-240 volts or from 220-240 volts down to 110-120 volts for both home use & industrial applications.

The THG-2000 is rated at 2,000 watts maximum, each features a standard heavy-duty cord with European plug plus a free European to American outlet plug adapter and one universal grounded outlet on the front panel for both US & European plugs.

For safety, it's recommended by the manufacturer that the voltage transformer's maximum power should be equal or greater than the power rating of your appliance multiplied by 1.5. For example, if you have an appliance rated at 100 watts, you will need to pick a transformer with a maximum power of 150 watts or greater.

Learn How Desk Task Lamp Solio Charger Tips Liver

Saturday, October 29, 2011

Simran AR-3000 3000-Watt Heavy Duty Voltage Regulator/Stabilizer with Built-In Step Up/Down Voltage Transformer, Grey

!: Cheap Simran AR-3000 3000-Watt Heavy Duty Voltage Regulator/Stabilizer with Built-In Step Up/Down Voltage Transformer, Grey Order Now

Brand : Simran
Rate :
Price : $77.25
Post Date : Oct 29, 2011 07:00:34
Usually ships in 1-2 business days


voltage regulator 3000 watts with power surge built in. Brand new never opened, continuous use power rating 3000 watts at 30 amps max rating

Kinesio Tape Review Quiz Sunbeam Clear Acrylic Computer Case Solve Pole Chain Saw Electric

Sunday, October 16, 2011

Power Bright VC3000W Voltage Transformer 3000 Watt Step Up/Down 110 Volt - 220 Volt

!: Last Minute Power Bright VC3000W Voltage Transformer 3000 Watt Step Up/Down 110 Volt - 220 Volt sale off

Brand : Power Bright | Rate : | Price : $100.00
Post Date : Oct 17, 2011 03:33:41 | Usually ships in 1-2 business days


3000 Watt Voltage Transformer (VC3000W) This voltage converter can be used in 110 volt countries and 220 volt countries. It will convert from 220-240 volt to 110-120 volt AND from 110-120 volt to 220-240 volt.

More Specification..!!

Promo Embroidery Machine Barudan !: Goodyear Snow Tires

Thursday, April 7, 2011

Yacht Power Inverters - A Guide

!: Yacht Power Inverters - A Guide

Power inverters

Computers, hi-fi and microwave ovens use considerable power, so if you're considering using them on board you'll probably need power inverters.

An inverter is probably one of the first extras most owners consider buying for their boat, whatever size it is. The ability to use 240V equipment when you are on passage or moored away from a shore supply is prized by most people. At the same time, an inverter is one of the easiest items to install, providing you understand the basic steps involved. Inverters range in size from 50W to 4kW, and can power most items that you now plug into the mains, but you need to understand their limitations, and for that you need to understand what makes them tick.

How they work An inverter takes low-voltage direct current (DC) from batteries, usually 12V or 24V, and converts it to high-voltage alternating current (AC), either 110V, 230V or 240V. The process is the same as your battery charger, except in reverse, and some combi models double as chargers, using the same basic electronics inside. Early inverters used transformers to step the volts up, and were heavy, but most modern models use solid-state electronics, both to step up the voltage and to convert the current from DC to AC, and are correspondingly lighter.

Domestic mains supply voltage follows a sine-wave form with a rounded top as the current alternates. But, while this wave form is easily produced by a rotating generator in a power station, it's more complex and costly to produce electronically and wastes more power. Instead many inverters use a modified sine-wave, or quasi sine-wave, which has a flat topped or square curve. The modified sine-wave powers most AC equipment, but can struggle with some items, particularly electronics with internal power supplies and digital timers like Computers, TVs and microwave ovens. Recently the internal power supplies for most electronic equipment have changed to switch-mode systems, which better handle poorer quality incoming AC. At the same time, the standard of the best modified sine-waves has improved markedly, close to that of a pure sine-wave.

Yacht batteries and marine batteries

An inverter can provide high outputs but all this power has to come from your batteries. Short burst high power appliances like a microwave oven, kettle, toaster or hair-dryer are fine, but to run heaters or machines for long, you need a very large battery bank or engine power.

As we have said, virtually anything that you now plug into the mains can be run from an inverter, but the size of your unit governs what it will power. Up to 500W you can run Computers, TV, hi-fi, battery chargers for your mobile phone and cameras, and even a 240V domestic fridge, though not always all at the same time.

Up to 1,000W, and you can add a small travel hair-dryer. For most people however the big plus is being able to run a microwave oven and for this you will need at least 1,500W, preferably 1,800W. Don't be confused by the 60OW or 80OW rating on most microwaves. This is the useful cooking power they generate, not the amount of power going in, which will be double this figure.

And at this size, your inverter should also power a standard hair-dryer, plus possibly a kettle, toaster and coffee-maker, though these may require 2kW.

Installing an inverter is within the capabilities of a competent DIY electrician, but if you've any doubts, leave it to a professional. A 2kW, 12V inverter will be drawing up to 200A from your batteries, more than many engine starter motors, so you need large diameter cables, short runs, and good connections. For the higher output models, use 50mm cables (35mm for lower outputs), a maximum of 1.5m long with properly crimped lugs, not screw connectors as they work loose. Anything less and you could lose too much power down the line, which means reduced performance and possibly tripping the inverter. You need proper cable from a battery dealer or automotive electrical supplier. Measure the exact length you want before you buy. They will probably crimp the terminals on for you, but check the diameter of the studs. Most batteries will be 8mm, but the inverter may be l0mm.

If you have to mount the inverter further away, use 70mm cable, or two 35mm cables in parallel for both positive and negative.

Unless a main input fuse is already fitted, you'll have to fit a 250A fuse in the supply line. It's also a good idea to have a separate battery master switch in line, so you can disconnect the unit completely. This must be capable of taking 250A continuous load. Check the size of its terminal studs - they will usually be l0mm.

The DC input terminals on some units were very close together, risking short circuit. If there are no plastic terminal covers, fit your own.

Your battery bank is a major consideration when fitting any but the smallest inverter ...If you take 200A out of a fully-charged 200Ah bank, the voltage at the battery terminals will drop from 12.6V to 11.0V at the inverter. If the bank is only half-charged, the voltage could be down to 10.5V, close to the low voltage tripping point of 10.0-10.5V.

If you're fitting a 21kW inverter, you should have a minimum of 400Ah batteries, preferably 600Ah. For a 1 kw unit, you will need 200Ah, preferably 300Ah.

All these figures assume the engine is not running, which is the usual situation when moored. If you start it up, you will get an input from the alternator, and the battery volts will rise, which will improve the situation, but you should not rely on this.

The condition of your batteries is also important. High continuous current drains will hammer the bank, and quickly find out any weak cells. Gel or AGM batteries will be better able to handle continuous heavy loads.

The 230V output from the inverter will be either one or more sockets on the front, or you may have to hard-wire a cable internally Again, only do this if you are sure of your proficiency. UK three-pin outlets are best fitted sideways or upside down so that large plugs or power-supplies dont foul the base.

Because the inverters have to be close to the batteries, they will usually be mounted in the engine space, or at least away from the galley area. But because most of them have a continuous residual current drain in standby-mode, you don't want to leave them permanently switched on. A remote control panel allows you to turn off the inverter when it's not needed.

Ideally you should fit a change-over switch in the output circuit to switch the incoming AC power between shore supply, generator, and inverter. It's important that you don't have two different power sources feeding into your ring main at the same time. Make sure you get the polarity right when connecting the DC or you could damage the unit

Any piece of electronic equipment will give a high short-term output, but will quickly cut out as it heats up. Best practice is to use the continuous rating to describe the unit. Having said that, the intermittent rating is important, as some pieces of AC equipment, particularly those with motors in them, have a start-up surge that needs a short burst of higher power.

Most power inverters drain a continuous current when switched on, even when you're not using them. This standby current will be at least 2A, sometimes more, which, over 24 hours, it could drain 50Ah or more from the batteries.

This is why a remote control is important. Some models have a powersave mode. This sends the unit to sleep while nothing is connected and wakes it up when it's needed. The drawback to this is that tiny currents, like the timer light on a microwave, will not trigger the unit, so the microwave won't start. Your mobile phone charger will also probably not activate the inverter, so you still need to turn it on manually.


Yacht Power Inverters - A Guide

!: Barcode Scanner Pdf417 Info !: Promo Carlos Falchi Handbags Sale !: Mice Exterminator Get It Now!

Sunday, April 3, 2011

Top 5 Great Converters 110 to 220 for 2011

!: Brimmed Beanie Tutorial !: Presentation Remote Laser Pointer !: Munro Walking Wedge Buy Online

Monday, March 28, 2011

Outdoor Lighting

!: Outdoor Lighting

Three Types of Outdoor Lighting

The three commonly used types of outdoor lighting are mains powered, low voltage, and solar. In some industrial applications, e.g. building sites, a voltage between mains and 12V is used. In the UK, where the normal mains is 240V, this is commonly 110V. The reasons for this are mainly that it is less dangerous in risky areas, while still giving reasonably strong lighting. There is also the advantage that theft of bulbs and other equipment is deterred, since they do not work properly off normal mains.

Mains Powered Outdoor Lighting

This gives the brightest light, and is almost always used for security lighting, or where bright light is needed outside. However, because mains cable is needed to power the lights, it must be well protected. If the light is wall mounted and the cable comes straight out of the wall this is no problem. If the cable is to be buried underground, armoured cable must be used, as a spade could easily go through ordinary mains cable. (Armoured cable is three or four core cable, with good insulation, and covered with strong steel strands wrapped around. Because the protection is stranded, it can be cut with normal cable cutters. Three core cable - live, neutral and earth - is used in most domestic installations, four core is used when a three phase supply is in use.) All light fittings must be suitable for outdour use, i.e. protected against water, and earthed, unless made all of plastic or rubber.

Domestic mains powered light fittings can vary from 40 watts up to at least 1000 watts floodlamps. The latter are only used if a very large area is needed to be lit up like daylight. Most gardens will be amply illuminated by a maximum of 500 watts for security and 40 to 100 watts for lighting up a small area such as a doorway. Low energy bulbs can be used in many outdoor lights, and are certainly advisable if the light is to be left on for any length of time. Specialist low energy bulbs, such as the yellow sodium lamps, used in much street lighting, usually require light fittings specially designed to take them. Photocells can be used to automatically switch lights on and off at dusk and dawn, and some light fittings come with these built in. Similarly PIR detectors switch lights on when someone approaches, and these are often built in to security lights. Photocells and PIR detectors are also available as separate, stand alone units, which can be connected to one or more light fittings.

Low Voltage Garden Lighting

This type of lighting gives less bright light than mains, but it is often still good enough to light up a path, bedding area, or even useful practical light if there are enough lights and they are near enough to where the light is wanted. The main advantage is they all work off a mains transformer, which plugs into a mains socket, but drops the voltage to (usually) 12V. This will still cause the lights to fail if someone puts a spade through the cable, for example, but the person will not be electrocuted. 12V is quite safe, so no special protection is needed for the cable.

Solar Powered Garden Lighting

Solar lights are the dimmest outside lights, but the LED bulbs are getting brighter all the time. They are usually used for effects in gardens, or to light the edges of a path. They are no use for practical lighting. Their big advantage is that no wiring is necessary. They work off power from the sun, and just need to be stuck in the ground (most come with a spike for doing this).

These work by light operating a solar panel during the day, to charge up a rechargeable battery. A photocell switches on an LED light bulb during darkness and this is powered from the charged up battery. During summer the light will generally last all night, but in winter it may not last more than a few hours. The light depends on the battery quality and capacity. If a solar light fails, goes dim or does not last very long, it usually means the rechargeable battery needs replacing.


Outdoor Lighting

!: Shopping Metallic Pewter Handbags !: German Army Poncho

Friday, March 25, 2011

VCT VS 350 - Heavy Duty 350 Watt Voltage Regulator / Stabilizer with built in Voltage Transformer for AC 110V to 220V / 240V

!1: Now is the time VCT VS 350 - Heavy Duty 350 Watt Voltage Regulator / Stabilizer with built in Voltage Transformer for AC 110V to 220V / 240V Order Today!


Nice Design by :UnknownOver All Rating Reviews : Great Deal : Date Created :Mar 26, 2011 05:20:06
Converts 110/120 V to 220/240 V OR converts 220/240 V to 110/120 V (switch is on back of unit) » On/Off switch with indicator lamp » Analog meter on front of unit shows exact output voltage » Voltage stabilizer good for countries with unstable voltage supply » 2 outlets on front of unit (outlets accept 3 or 2 prong US plugs and 2 prong Euro/Asian plugs) » Insulated power cord is hard wired with a European Shucko plug also good for Asian outlets (grounded 3 prong US adapter also available - Item No. VP 13) » Heavy-duty metal casing and durable design » Comes with round and flat pin plugs for use in USA, Canada, and Mexico » Fuse protectedWeight: 10 LbsDimensions(LxBxH): 10" X 9" X 7"

!: Good Yamaha Keyboard Stand !: Cracker Jacks Popcorn

Tuesday, March 22, 2011

Buying Guide for Voltage Converters

!: Buying Guide for Voltage Converters

Voltage converters are a fairly simple piece of equipment... but that certainly doesn't mean that you don't need to pay attention to quality! Getting the wrong converter, or a poor quality converter, can literally fry the circuits in your appliances. Any damage done by using a poor quality converter would certainly not be covered by warranty, either. Given that it is difficult to tell how a voltage converter is working, it makes sense to play it safe, do the research to ensure you're getting the right model, and to buy well above the bottom of the range for safety.

What type of converter do I need?

If you're going from low voltage appliance to high voltage mains (110 - 220V), you'll need a step up converter. If you're going from high voltage appliance to low voltage mains (220V or 240V to 110V), you'll need a step down converter.

If you're going from a country with 50Hz cycle power to 60Hz or vice versa, you should also get a converter that can change the cycle of power. Appliances with motors may run too fast and burn out more quickly, also appliances with inbuilt clocks won't keep correct time on a different cycle of power.

If you are going from DC to AC power, you'll need an 'inverter', not a 'converter'.

Look for...

When you're buying a converter, look for the following safety and performance features:

* Fuse protection: If there is a power surge in a step-down converter, it can really damage the appliances - fuse protection prevents this occurring.
* On-off switches: These are actually very handy; they help prevent your appliance shorting in the time it is being plugged in.
* Power on indicator: Of course, if you're going to have an on-off switch, it makes sense to have an easy way to tell what it's flipped to!
* AC shockproof sockets: Another fairly essential safety feature
* Durable cords and chassis: You'll want to ensure there is no risk of shock from poorly made cords or structurally inadequate equipment.
* Regulator: Not all converters are voltage regulators, and it isn't always necessary to get regulator. However, if you have an appliance that is especially sensitive to voltage, it can help prevent problems and extend its lifespan by buying a converter that is also a regulator.
* Plug converters included! Of course, this is not an essential feature either... but you can't imagine how many people get their voltage converter in the post, rush to plug in their new appliance, and find forlornly that the plug shapes don't match!

Voltage Converter Brands

Many converters are not branded; many good voltage converters are also sold through small, independently owned websites. You certainly want to buy quality when you are getting a voltage converter, but you don't need to go to a national chain store or find a converter made by a massive multinational to avoid damaging your appliances.

Your best guide to quality in converters is price. Compare the prices from 3 different stores before you buy, and go for a model that is either mid- or top-of-the-range.


Buying Guide for Voltage Converters

!: Piano Portable Keyboard Review !: Pro Series 3 Radon Detector Tips Liver !: Panasonic Lumix Dmc-fz50 Price

Saturday, March 19, 2011

Power Bright VC100W Voltage Transformer 100 Watt Step Up/Down 110 Volt - 220 Volt

!: discounted Power Bright VC100W Voltage Transformer 100 Watt Step Up/Down 110 Volt - 220 Volt coupon

Brand : Power Bright | Rate : | Price : $13.99
Post Date : Mar 20, 2011 04:36:08 | Usually ships in 1-2 business days


This is a voltage converter or transformer that can be used as a step up transformer in 110/120 volt countries or as a step down transformer in 220/230/240 volt countries. This heavy duty voltage transformer can be used for continuous duty. It will convert voltages of 220-240 volts to 110-120 and will also convert voltages from 110-120 to 220-240 volts.

More Specification..!!

!: Promotional Yamaha Ypg525


Twitter Facebook Flickr RSS


Français Deutsch Italiano Português
Español 日本語 한국의 中国简体。